We are finally making some progress on the new shop. Remember when I said we had a wonderful opportunity come our way involving a great old building right smack
in the heart of our quaint little town?
Well here it is!
(Ignore the ginormous pots of trees, they are getting picked up.)
This building is amazing. The area is amazing and we are honestly so thrilled.
We are making a huge life change to go for our dreams and it is so exciting and scary at the same time but I think thats what life is about, you know?
Taking a chance and going for what truly makes you happy.
We still have a lot to do,
even though the inside doesnt really need anything but painting and cleaning.
Heres a view from the inside.
Pretty cool, huh?
The ceiling is way up there and is decked out with the original tin tiles.
And Im crazy about the double stacked windows and wood trim.
I cant wait to polish that up.
Even the view out the window is amazing.
Love the brick with the vine creeping over it.
And the view down the sidewalk.
There are so many cool businesses and buildings in the historical area of our city and Im going to be sharing those with you over the next month or so as we count down to our grand opening.
Heres the view from the opposite direction to the left.
This is a great little place to eat, too.
And a perfect little junk store, right next door, where I bought the hutch I recently
added to our dining room.
I love that place and the owners are so friendly.
So when will the grand opening be?
Our goal is October 15 and not a day later.
Heres what Im thinking for the window......
(just for design purposes, not really on the windows)
I really would like it to be symmetrical, however, the bar divide down the center of the window is making it difficult for me to figure out how to achieve this. Do we put it all on one side of the window? Or ignore the bar and put the whole thing in the center? Im just not sure but I do love it on the window and I love the font.Would love to hear your suggestions on placement!
We are so excited about this journey!
And cant thank you enough for your amazing support and encouragement
Here is my newest re-do (Im on a tear lately refinishing stuff!).
This was a nice little antique dresser I picked up from CL. I met a lady
who handles estate sales. She got this from the original owner, so it was in ok
shape. The top was pretty messed up and it
had a lot of dings and scratches, but the drawers were in pretty
good condition for being 80 years old!
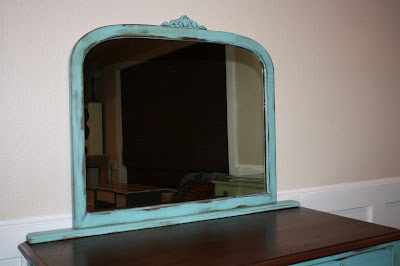
two sided sticky tape was used to affix the mirror to the back:( Im still working on fixing and painting the mirror part.
Mr. Agave!So I wanted to do an aqua-y color, but I wanted a bit of green to show through.
I just love blues and greens. So I played around with the colors and used my
new shades from Martha.
This photo was used with a flash. You can see how the color washes out.
I brushed on Behrs "lilypad" before going over it with my chalk paint made from
MS "lagoon".
The top I refinished in Varathane "Gel Walnut". This stuff is the bomb people.
Forget the Minwax. This gel stain is fabuloso!!! So easy and nice and comes out
flawless. It dried so quickly because this wood was so dried out. I used one
coat of the gel, a seal-coat, and then finished it with dark paste wax.
The whole dresser got a coat of dark wax to tone down the color
and give it an aged look.
I really hate the waxing process. :)
It was a cloudy afternoon. Again, the flash just kills the colors.
I wasnt sure which hardware to go with. I tried on many different knobs.
I didnt have anything in the blue/green family except some light blue milk glass.
It looked a bit nursery-ish and too close to the color of the paint.
I was going to line the drawers with this fabric. Apparently Ill have to line it with the cat as well.
So here is a shot with a portion of the mirror done. I still have to do the arm thingy-s that allow it to move.
The mirror by itself is actually a beautiful piece. Since the piece that was affixed to the top with sticky tape was literally falling apart, Hub made a new one to set on the top. There is another piece that attaches to the mirror (I dont have that in the photo)Im actually leaving that natural wood.
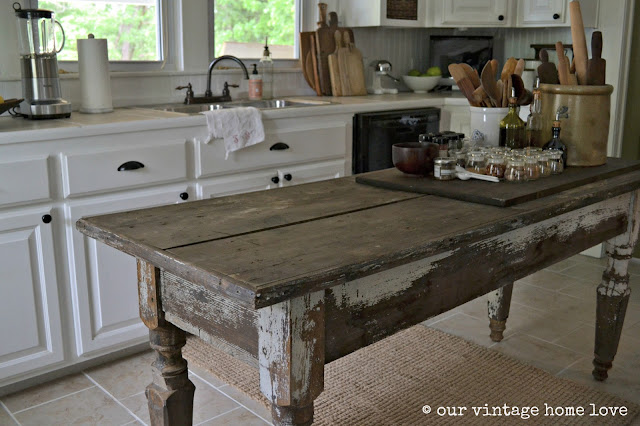
Last week I came across a fabulous gem that just happened to be in our own store. I dont work there that often and sometimes my hubby will get sneaky and bypass me completely when he finds inventory so that I wont want to keep things for myself. So, I happened to pop into the shop early one morning last week to do some cleaning when this fantastic piece stopped me in my tracks right at the door.
Of course I immediately called him and asked if I could take it home and being the sweet man that he is, he didnt mind at all. So we loaded her up and I parted with our barnwood table I built and put it in the shop in its place so it really was a win win, right?! This farmhouse table must have previously had a sink in it as there was a hole in that shape in the top. I didnt care cause I knew I could cover it with a piece of wood. The patina on the table is probably the best I have ever seen.
It is the perfect worktable for our kitchen. The perfect height for being able to use for rolling out pastry and baking.
The other side has an open shelf space that is perfect for storage.
I also worked on another open shelf project with a thick piece of barn wood that my hubby found in a local creek. Its been drying out and aging for about a year and I finally decided to use it for my cookbook collection. I really do like having them displayed for inspiration.
The wood pantry that used to sit in that area is now in our laundry room where we needed storage, so that worked out perfectly as well.
And yes, I do enjoy changing things up in the kitchen often. :)


 <
<


 The mirror by itself is actually a beautiful piece. Since the piece that was affixed to the top with
 Of course I immediately called him and asked if I could take it home and being the sweet man that he is, he didnt mind at all. So we loaded her up and I parted with our barnwood table I built and put it in the shop in its place so it really was a win win, right?!
 It is the perfect worktable for our kitchen. The perfect height for being able to use for rolling out pastry and baking.
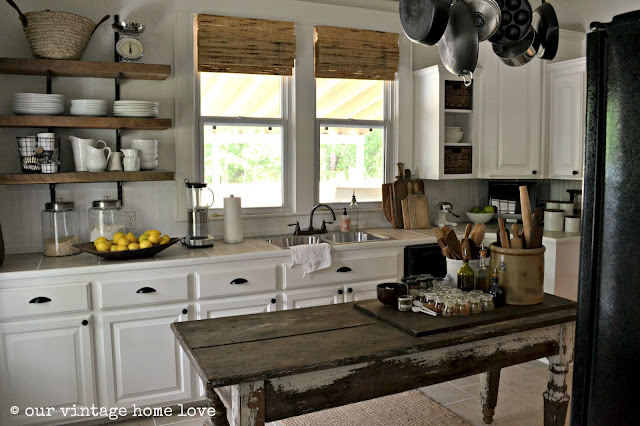

 The other side has an open shelf space that is perfect for storage.
 I also worked on another open shelf project with a thick piece of barn wood that my hubby found in a local creek. Its been drying out and aging for about a year and I finally decided to use it for my cookbook collection. I really do like having them displayed for inspiration.
 The wood pantry that used to sit in that area is now in our laundry room where we needed storage, so that worked out perfectly as well.
  And yes, I do enjoy changing things up in the kitchen often. :)
 Anyone else the same way?


