Tampilkan postingan dengan label drawer. Tampilkan semua postingan

A HUSBANDS INVESTMENT soft blue 3 drawer chest

Jumat, 10 Juni 2016

0 komentar
Before I knew it George was bidding on a three drawer chest
at our very first auction.
 
I was some what shocked as we had not looked at the piece before the bidding started
and we didnt have a good view of it from where we sat.
With in moments he had won and was holding his number up to the auctioner.
I quietly whispered to him "thats more then I would normally spend
and I dont know that I even want that"
His response was
"Its my investment, Ill get good return on it when you re-do it"
For those of you who have got to know George he can be quite the character
best friend, supportive hubby, and even has a good idea now and then.
 
There are some elements I just dont mention often enough when
revamping icky furniture such as ...
 #1. Creatures that have come to call these places home.
This dresser housed one partticulary large monster of the 8 legged variety.
(NO VISUAL)
#2. The *stuff* that builds up from use over time behind the hardware,
These are the moments I wonder ...
is blasting the entire unit with a garden hose really such a bad idea?
#3. Remembering to turn your project upside down when you start offers so many benefits.
You can vacuum out the insides so much easier,
the top surface is protected if you dont intend to paint it,
its much easier to see and deal with repairs needed on the underside,
and no crawling around on your hands and knees to paint.
Pure White mixed with Provence ASCP
Above you can see the difference of the untouched side panel
and the sanded side shelf and drawer faces.
Once wax is applied to the distressed paint the color pops again
and the distressing stands out.
Stripped and Sanded Top
Stained Top
4 Coats of Poly Applied
The top of this piece turned out magnificent.
This chest would be a great bathroom vanity.
These pretty side panels with shelf are just waiting for someone
to install hanging racks to display guest towels.
Georges investment is finished and a good friend of his is now the proud owner.
Sharing at:
Read More..

Little dresser with owl knobs and a surprise waiting behind the drawer!!!

Jumat, 06 Mei 2016

0 komentar
I picked up this cute little guy cuz I missed doing the old antique stuff!
I love working on the old wood! Thought I would do my stained flower thing on this one.
But Lord have mercy!! One never knows what one is going to find when removing the drawers!! 
           38D anyone?????  Dang. Not my size.  sigh..........
I used various shades of stain. I just kind of wing it as I go. Sealed with a semi-gloss. 
 I layered some yellow underneath. Custom color chalk paint in a tealy-bluish. lol
Love these little owl knobs!
Linking up at my fave parties!! :
Kammys Korner - Trash to Treasure Tuesdays
Domestically Speaking - The Power of Paint Party
The Shabby Creek Cottage - Transformation Thursday
Miss Mustardseed - Furniture Feature Friday
Redoux - Friday Link Up Party
Homespun Happenings - Rustic Restorations Weekend
Funky Junk Interiors - Saturday Night Special
1929 Charmer - Sundays Best Party
Knick of Time Interiors - Knick of Time Tuesday
Elizabeth and Co., My uncommon Slice of Suburbia,
Savvy Southern Style. Weds, Beyond the Picket Fence, PJH Designs
From my Front Porch to Yours,  The 36th Avenue,
Between Naps on the Porch
                                                   The Dedicated House,-Mon
                                         Redoux
Read More..

MODERN CONVENIENCE french provincial 4 drawer dresser

Selasa, 19 April 2016

0 komentar
George has loved this dresser for quite some time but alas,
if you love something you must set it free. 
It was painted in old white and distressed to give it more age than it actually has.
We had bought both this dresser and a matching desk,
when we moved in together.
The desk was painted and sold long ago, (stop pouting Elinor)
But in the last few months once it was clear it was going to have to find a new home
the dresser became another victim to Chalk Paint.
This dresser has pretty provincial handles and the modern convenience of roller drawers. 
 
You can find the side by side before and after here
Read More..

CLASSIC FRENCH 6 drawer dresser

Sabtu, 16 April 2016

0 komentar
Today is a simple project,
but always a fun project when using ASCP and wax.
I used bright white ASCP and clear wax,
with a gentle distressing to the curves and details.
The six drawers work great after finding the right positions for them,
and a little help from me. 
It has classic provincial hardware and
fabulous solid wood cabriole legs.
Dove tailed drawers
Manufactured by Henry Link.
This chest of drawers also matches this cute single night table.
Sharing with:
Photobucket
Read More..

WALLPAPERED DRAWER LINERS part 2

Jumat, 01 April 2016

0 komentar
 
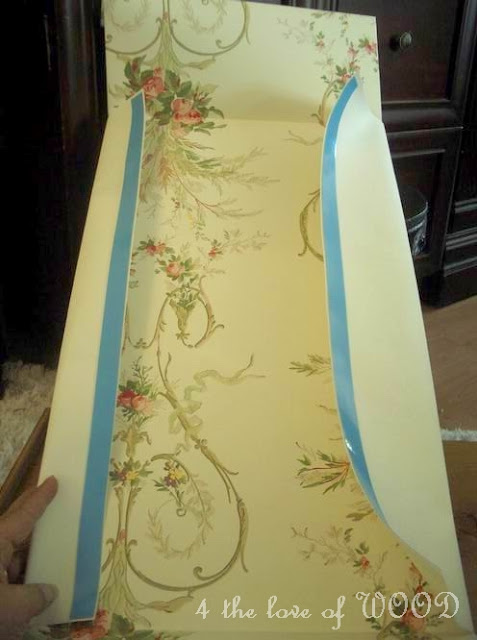
Part 1 showed you how to cut and fold your drawer liner.
Part 2 is how to adhere non pre-pasted wallpaper in your drawers.
 
 
You can buy a bucket of wallpaper paste
or you can use double sided tape.


Your drawer has to be dust free before you start.


I run a strip along the front and back edge of the drawer bottom. 
 
 
Next I run strips along the papers edge on the front and back flaps. 


Inside the drawer, start exposing the stick side of the tape. 
 
 
Now drop your paper liner into the drawer, smoothing from the center out to the exposed tape.
 
 
Next remove the tape backing on the front and back flaps. 


One at a time, press the front and back flaps into place.
Always start in the center and work your way to the outer edges.


Here is the front edge once smoothed out and stuck into place. 


Now its time for the side flaps. As before stick your double side
 tape to the top inside edge of the side flap, expose the sticky side and press it into place.


There is your completed drawer lining. 
 
I chose not to trim the excess paper on this job because the
 extra volume adds a pillowy or padded effect to
 the sides which I wanted. If I was using a pre-pasted
 paper and gluing it in, I would trim the excess.
Part one can be found here
and this wallpaper can be purchased here
Other tutorials can be read here
 
 
Read More..

Copyright © 2014-2022 I Love Woodworking | Powered By Blogger